Resolution:
We need to run the installation in elevated mode:
Right click on the installation/Setup(.exe) file and select "Run as administrator". If prompted, type the administrator user account password. Follow the onscreen instructions to complete the installation. This worked for us.
You may visit below weblink for more details:
http://discussion.autodesk.com/thread.jspa?messageID=5551915
Tuesday, December 16, 2008
Unable to install printer. The error message is “ printer spooler service is not on”.
Cause: This error occurs because the Spooler service has not been started or has stopped working.
Resolution :
Step 1
Start the Spooler service, follow these steps:
1. Click Start>>Control Panel. Click on "Classic view" from top left.
2. Double-click Administrative Tools, and then click Services.
3. Double-click the Printer Spooler service, and then change the startup type to Automatic. This sets the Spooler service to start automatically.
4. To restart the Printer spooler service, immediately, click the Start button under the Service Status field.
Performing the above steps the error message in the services.msc will be “Error 1075: The dependency service does not exist or has been marked for deletion.” .
Performing below steps will resolve the issue online.
Step 2:
Windows XP:
Click Start, Run and type the following:
CMD /K SC CONFIG SPOOLER DEPEND= RPCSS
Windows Vista:
Click on start button, type Command in the search box, the "Command prompt" will appear in the start menu. Right click on the Command prompt and select "run as administrator". Type the administrator password if prompted and confirm once you are at command prompt,
Once you are at the command prompt, type the below command and hit enter button
CMD /K SC CONFIG SPOOLER DEPEND= RPCSS
You should get "ChangeServiceConfig success" message.
The Alternative steps , to accomplish this using Registry Editor:
1. Click Start, which is above the Start button in the search box type Regedit.exe
2. Navigate to the following branch
3. HKEY_LOCAL_MACHINE \ SYSTEM \ CurrentControlSet \ Services \ Spooler
4. In the right-pane, double-click the DependOnService value
5. Delete the existing data, and then type RPCSS
6. Close Regedit.exe
For reference you can refer below link:
http://www.winhelponline.com/articles/9/1/
Saturday, December 13, 2008
Steps to configure Media Center for TV viewing in the Microsoft® Windows Vista operating system.
Follow this procedure to configure Media Center for TV viewing in the Microsoft® Windows Vista™ operating system.
NOTE: Make sure that Windows Media Center has been properly setup before proceeding. (check for steps below)
1. Click the Start button, click All Programs, and then click Windows Media Center.
2. In the Start screen, scroll to Tasks, and then scroll to and click Settings.
3. In the Settings screen, click TV.
4. In the TV Settings screen, click Set up TV Signal.
5. At the TV Signal Setup dialog box, click Yes.
6. In the Set Up Your TV Signal screen, click Next.
7. In the Confirm Your Region screen, click to select Yes, use this region to configure TV services.
NOTE: If the displayed region is not correct, click No, I want to select a different region and then click to select the desired region.
8. In the Download TV Setup Options screen, click the Next button.
NOTE: Once the automatic detection process begins, Windows Media Center will determine if the TV signal is coming directly from a tuner or if a set-top box is present.
9. In the Automatic TV Signal Setup screen, click to select the desired configuration option, and then click the Next button.
NOTE: If you click to select I will manually configure my TV signal, proceed with the next step. If you click to select Configure my TV signal automatically, proceed to step 12.
10. In the Select Your TV Signal screen, click to select the appropriate TV signal type, and then click the Next button.
11. In the Do you Have a Set-top Box screen, click to select the appropriate answer, and then click the Next button.
12. In the You Are Done screen, click to select Set Up listings.
13. In the Set Up Your TV Program Guide screen, click the Next button.
14. In the Guide Privacy screen, click to select Yes, and then click the Next button.
IMPORTANT: Selecting No will prevent the use of the Electronic Program Guide.
15. In the Guide Terms of Service screen, click to select I agree, and then click the Next button.
IMPORTANT: Selecting I do not agree will prevent the use of the Electronic Program Guide.
16. In the Enter Your Zip Code screen, enter the appropriate 5 digit zip code, and then click the Next button.
17. In the Select TV Signal Provider screen, click to select the appropriate local TV signal provider, and then click the Next button.
18. In the Download TV Program Guide screen, once the Download Complete message is displayed, click the Next button.
19. In the You Are Done screen, click Finish.
NOTE: You can now begin watching live TV using Media Center.
How to setup Windows Media Center.
Follow this procedure to setup Windows Media Center.
1. Click the Start button, click All Programs, and then click Windows Media Center.
NOTES: * The Express Setup option is the fastest and recommended setup method.
* Selecting Custom Setup will allow you to select which components of the Windows Media Center you want to setup.
1. At the Welcome screen, click the desired setup option, and then click the OK button.
Setting up radio stations in Media Center:
1.Press the Media Center Start button on the remote control.
2.Select Radio.
3.Enter a radio station number by using the numeric keypad on the remote control or your keyboard.
Or
4.Select the Seek (-) or (+) buttons to find the next playable station.
Or
5.Select the Tune (-) or (+) buttons to manually find a station.
6.Select Save to save the station as one of the nine pre-set stations.
7.Select Start FM to begin playing the station.
Use the following steps to play FM radio:
1.Press the Media Center Start button on the remote control.
2.Select Radio.
3.Select one of the preset radio stations, or use Seek or Tune to find a radio station.
4.Select Start FM to begin playing the station.
Use the playback controls on the remote control, such as Pause, Rewind, and Fast-Forward to control radio playback. If you press the Pause button, Media Center continues to record the program for up to 30 minutes. Press Play to resume listening to the program where you left off.
If needed, perform the steps given in the below weblink to troubleshoot FM:
Troubleshoot problems with radio stations in Windows Media Center
http://windowshelp.microsoft.com/Windows/en-US/Help/b70a8557-2bbb-41e0-9f25-cd7c2bb6f9841033.mspx
Recommended steps to perform virus/spyware scan on windows vista
Download Superantispyware free edition from below weblink:
http://downloads.superantispyware.com/downloads/SUPERAntiSpyware.exe
Most of the virus, spyware do not get detected in Normal mode. So its recommended to run virus scan in Safe Mode using below steps:
Run complete virus scan on PC. There are three steps to be performed to perform a complete scan on the computer:
1. Disable the System Restore:
i. Click on Start, type system into the "Start Search". Right click on "System" from menu and select Run as administrator.
ii. Click on "Advanced System settings".
iii. "System protection" tab. Once you uncheck the drive, click the "Turn System Restore Off" button.
2. Steps to start the computer in Safe Mode:
i. Shut down the computer and restart the computer.
ii. Keep tapping F8 key on the keyboard when you see the blue HP logo.
iii. In the Windows Startup, select the option Safe Mode.
3. Once the computer started in Safe Mode, you may scan the computer with the antivirus software installed on the computer.
Click Start –All Programs—Antivirus/Antispyware program you are using
Friday, December 12, 2008
Enabling and Disabling firewall in Windows Vista
Disable firewall in Windows Vista:
Click on Start >> Start Search >> Type " firewall.cpl " (without quotes) and hit enter. Disable firewall and click OK.

Enable firewall in Windows Vista:
Click on start >> Start Search>> type "services.msc" and search for "Security Center"
Select startup type as " Automatic" from the drop down.
Under service status, click on "Start" button to start the service. Click OK
Click on Start >> Start Search >> Type " firewall.cpl " (without quotes) and hit enter. Enable firewall and click OK.
CD/DVD drive missing from Computer for VISTA
We will check the DVD drive status in Device Manager. Please follow the below steps on order to open the device manager window:
Click on start (pearl button), in the command box type " devmgmt.msc " without quotes and hit enter button on the keyboard. Click on the (+) next to the "CD/DVD ROM drive".
If there are any device with yellow marks, error code or any exclamation mark on the device then close device manager and perform below mentioned steps:
We need to make some changes in registry and reinstall the driver in order to fix the issue.
Before making any changes in the registry please take backup of registry using the below steps:
1) Click on start button, in the Start Search box, type regedit.exe and hit Enter.
2) Click on the "file" menu and select "export".
3) You will get "export registry window". From the "save in" drop down menu which is at the top, select "desktop" and enter the "file name" as backup. Finally click on "save" button to save the backup file.
In registry editor windows, click the plus sign ( +) next to the following folder one by one in the list:
HKEY_LOCAL_MACHINE
SYSTEM
CurrentControlSet
Control
Class
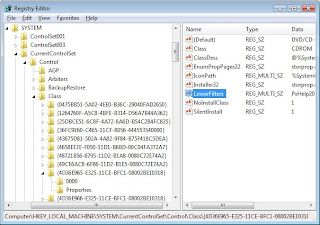
Under "Class" select "4D36E965-E325-11CE-BFC1-08002BE10318". Make sure you have selected this exact key name.
2)Do you see "lowerfilters" value on the right side of the screen?
Select the LowerFilters value and press the Delete key. Confirm the deletion by clicking Yes.
3) Do you also have "upperfilters" value on the right side of the screen?
Select the Upperfilters value and press the Delete key. Confirm the deletion by clicking Yes.
Once we have deleted all the lowerfilter and upperfilter values, lets uninstall and reinstall the CD/DVD drive driver using the below steps:
1) Please open device manager again. Click on start button, in the Search box type devmgmt.msc and hit Enter button on the keyboard.
2) Click on the (+) next to the "CD/DVD ROM drive".
3) Right click on the device listed under CD/DVD ROM(The one with yellow mark)and select uninstall. Confirm to continue uninstallation.
4) Right click any of the devices listed in the device manager and select "scan for hardware changes".
5) Now CD/DVD drive should be listed in the device manager with no yellow marks.
6) Check if you have the drive listed under computer window.
Install Java for Windows Vista
Please try to install Java from the below weblink and let me know the result:
http://www.java.com/en/download/index.jsp
Before trying again, clear your Temporary Internet Files cache: in Internet
Explorer, go to Tools menu, Internet Options, General, Delete, Delete Files
(don't delete cookies, etc; unless you really want to - only Files). Then
restart IE.
If it still fails, try the procedure described at:
http://www.java.com/en/download/help/6000010300.xml
Java 6 Update 11 is compatible with Vista and should normally it install
okay.
Monday, December 8, 2008
Reset Internet Explorer 7 in Vista
We cannot reinstall IE (Internet Explorer). Resseting IE 7 settings can resolve many types of problems. Use the following steps to reset the settings in Internet Explorer 7:
1) Open Internet Explorer and click Tools and then Internet Options.(If Tools menu is not visible, press ALT button on Keyboard.)
2) Click the Advanced tab.
3) Click Reset.
4) When done, close all open IE windows, reopen IE 7, and then try to view the Web page again.

1) Open Internet Explorer and click Tools and then Internet Options.(If Tools menu is not visible, press ALT button on Keyboard.)
2) Click the Advanced tab.
3) Click Reset.
4) When done, close all open IE windows, reopen IE 7, and then try to view the Web page again.
Steps to increase system performance in Vista
Step I - MSCONFIG:
Follow the steps given below to remove unnecessary startup programs :
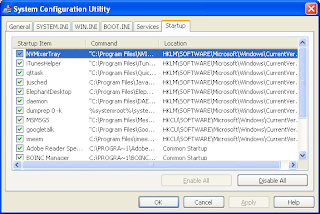
1. Click Start, Start Search.
2. Type MSCONFIG
3. Hit Enter
4. Click STARTUP tab
5. Uncheck all the programs except PS2, KBD, Igfxtray, Hkcmd and all entries starting with cc, like ccRegvfy and ccApp
NOTE : All the processes provided above may not available. Ignore them if they are not available.
6. Click "Apply" then click on "close"
7. Restart the computer.
After restarting the computer, If you see a message "System Configuration Utility. You are using the selective startup for troubleshooting your system", check the option and click OK. This occurs if you are using the Selective startup option but not using the normal startup to reduce the number of startup programs.
Step II - Delete Temporary Files
1. Start -> Start Search. Type "%temp%" (Without quotes)
2. Hit Enter
3. Delete all the files in the Temp Folder
Step III - Delete Cookies, Delete files, history in Internet Explorer:
1. Open Internet Explorer Window
2. Click on Tools tab and select Internet options
3. Click on 'Delete Cookies' tab and click on OK
4. Click on 'Delete Files' and check the option 'Delete all offline content' and click on OK
5. Click on 'Clear History' and click Yes
6. Click Apply and click OK
Step IV - Run the "Disk CleanUp".
1. Close all open software applications including virus-scanning software.
2. Click Start, All Programs, Accessories, System Tools, and then Disk Cleanup
3. Select (C:), and click OK.
4. Wait for disk cleanup to calculate how much disk space it can save
5. Select the types of files that you want to delete.
6. Click OK. It may take a while for the Disk Cleanup utility to remove the files
Step V - Increase the size of virtual memory :
1. Click Start and then Control Panel
2. Double-click the System icon
3. Click on the Advanced tab
4. Click the Settings button under Performance option
5. Click Advanced tab
6. Click on the Change button under Virtual Memory
7. Now, in the box below, increase the number. This will increase the size of virtual memory (low=2 times of RAM, max= 4 Times of RAM)
8. Click on Set button. Click Okay your way out of it
Step VI - Uninstall Unnecessary Programs from Add/Remove Programs:
1. Start -> Control Panel
2. Click on option 'Switch to Classic view', which is located on the left top corner of the control panel window
3. Double click on Programs and Features.
4. Now remove unnecessary programs by clicking on Remove/uninstall button near/under the program
Step VII - Registry:
1. Start -> Start Search type "Regedit" and hit Enter
2. Click on (+) next to HKEY_LOCAL_MACHINE\SYSTEM\ControlSet001\Control
3. "WaitToKillServiceTimeout"
4. Change the Value from 20000 to 200
Step VIII - Spy Subtract:
The issue could also be due to spyware files installed on the computer.
I suggest you to perform a spyware removal scan using the "Trend Micro Anti-Spyware Utility" which would remove all the Spyware installed in the computer.
You can download and install the 30 day trial version "Trend Micro Anti-Spyware Utility" from the web site given below:
http://www.trendmicro.com/download/product.asp?productid=62
Please follow these steps to download, install and use Trend Micro Anti-Spyware :
1. Under Trend Micro Click on Download Free Trail.
2. Click on Save.
3. Select Desktop and Click Save.
4. Doubleclick on the Trend Micro icon on the Desktop to Install the software.
5. Click Next
6. Click Accept
7. Select the type of Internet Connection you have and click Next
8. Type your email address and click Next
9. Click Next
10. Select No and click Next.
11. Click Finish.
12. Click Start -> All Programs -> Trend Micro -> Trend Micro.
13. Click Scan.
14. Place a check mark beside " perform a Full Scan".
15. Click Start.
16. Click Next to Delete the detected Files.
17. Select all the detected files by putting a Check Mark besides the items.
18. Click Delete.
19. Restart the computer for the changes to occur.
Subscribe to:
Posts (Atom)


